

You have just spent the last three hours meticulously cutting a video. You’ve synced the audio perfectly, added the right transitions, color-graded your clips, and timed the text templates down to the millisecond. You confidently click the “Export” button, set your resolution, and watch the progress bar tick up.
24%… 48%… 73%… And then, boom. It stops dead.
The progress bar turns red, or a sudden, frustrating notification pops up on your screen: “Export failed.” No detailed error log, no explanation of which frame broke the render engine—just a brick wall between you and your finished video.
If you edit content for social channels or client projects, this is easily one of the most rage-inducing moments you can face. I went through this exact nightmare a few nights ago while rendering a heavy, multi-layered vertical video on CapCut Desktop. The export would consistently freeze at exactly 82%.
Because CapCut packs so many cloud-based effects, auto-captions, and AI-driven features into an accessible interface, its rendering pipeline is surprisingly fragile. When you hit a render failure, it usually means the software has run out of memory, encountered a corrupted asset, or lost its path to your storage drive.
After aggressively troubleshooting my own timelines and talking with other creators who live in the app, I’ve mapped out the exact breakdown of why CapCut exports fail and how to force your video through to the finish line.
Why Do CapCut Exports Fail?
When CapCut rejects an export request, it is almost always struggling with local hardware limitations or a specific “corrupted” point on your timeline. Here are the most common bottlenecks:
- Storage Deficits: Your phone or computer hard drive does not have enough continuous block space to assemble the temporary cache files required during compression.
- VRAM and RAM Exhaustion: You are trying to export a 4K video at 60 FPS on a machine or mobile device with integrated graphics or low memory, causing the video card drivers to crash mid-render.
- Corrupted Cloud Assets: A specific sticker, text effect, or background audio track failed to download completely from CapCut’s servers, leaving a “blank hole” that breaks the encoder script.
- Variable Frame Rate (VFR) Conflicts: Mixing clips shot on different devices (like an iPhone, a screen recorder, and a DSLR camera) on the same timeline can cause the rendering engine to lose track of the frame math.
Step-by-Step Solutions to Fix Failed Exports
Before you delete your app or give up on your project, walk through these practical, battle-tested fixes to diagnose and solve the issue.
1. The “Divide and Conquer” Timeline Check (Find the Broken Frame)
If your export constantly freezes at the exact same percentage every single time, you aren’t dealing with a hardware issue. You have a corrupted asset at that exact spot on your timeline.
Let’s use some basic math to locate it:
- Note the exact percentage where the export fails (e.g., 50%).
- Look at the total length of your video timeline. If your video is 2 minutes long, 50% means the error is happening exactly around the 1-minute mark.
- Scroll to that exact timestamp on your CapCut timeline and look closely. Is there a heavy third-party effect, a complex font style, or a clip transition sitting right there?
- The Fix: Delete that specific effect or transition, or replace that individual video clip with a fresh copy. Try exporting again. Nine times out of ten, removing the single problematic asset solves the entire freeze.
2. Free Up “Invisible” Storage Space
A common trap creators fall into is looking at their storage and thinking, “I have 5 GB free, and my video is only 500 MB, so space isn’t the issue.”
That assumption will break your workflow. During the export process, CapCut doesn’t just write the final file; it simultaneously unpacks uncompressed temporary frames, audio layers, and rendering cache files. This process often requires three to four times the final file size in temporary storage space.
- On Mobile: Go to your phone’s main settings, open storage, and clear out old heavy apps or temporary videos. Aim for at least 10 GB of free space before rendering complex edits.
- On Desktop: Go to CapCut’s home menu, click settings, navigate to the Cache tab, and hit the delete icon. Wiping CapCut’s temporary layout cache will not delete your video projects, but it will instantly free up massive amounts of storage space for the renderer to use.
3. Downshift Your Export Settings
We all want our videos to look crisp, but cranking every single slider to the maximum setting can easily overwhelm your device’s hardware, leading to a driver crash.
If your project fails to export, open the export settings panel and make these strategic adjustments:
- Resolution: If you are trying to export in 4K, drop it down to 1080p. On standard mobile screens and social feeds, the visual difference is negligible, but it cuts the computing load on your device by more than half.
- Bitrate: Instead of choosing “Higher” or manually setting a massive custom bitrate, switch it to Recommended or CBR (Constant Bitrate). This allows CapCut to use an optimized, stable encoding curve.
- Frame Rate: Drop your frame rate down from 60 FPS to 30 FPS. This instantly slashes the total number of frames your graphics card has to process by 50%.
4. Turn Off Hardware Decoding/Encoding (Desktop Fix)
CapCut uses your graphics card (GPU) to accelerate rendering speeds. However, if your graphics drivers are outdated, or if you are running an older integrated GPU, this acceleration layer can fail mid-render, throwing an unhelpful failure message.
You can force CapCut to handle the rendering math directly through your main processor instead:
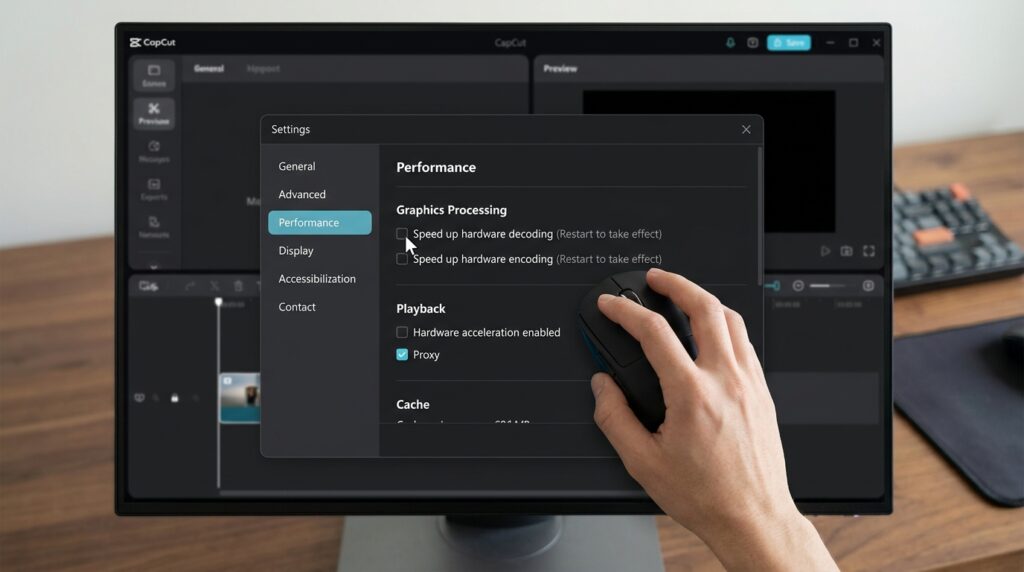
- On CapCut Desktop, go to the top left menu and click Settings.
- Navigate to the Performance tab.
- Uncheck the boxes for Speed up hardware decoding and Speed up hardware encoding.
- Click Save, close the program completely, reopen your project, and attempt the export again.
Note: Disabling hardware acceleration will make your export take longer to complete, but it uses a much more stable processing path that bypasses erratic GPU driver crashes.
5. Standardize Your Media Formats
If you are mixing highly compressed screen recordings, high-bitrate phone video, and audio files downloaded from random internet converters, CapCut’s internal timeline tracker can experience a calculation failure during encoding.
If you suspect conflicting file types are breaking your timeline, use a free, trusted external tool like HandBrake (on PC/Mac) to pre-convert your problematic source clips into a standard, universally accepted format:
- Video: Convert clips to MP4 (H.264) at a constant frame rate.
- Audio: Convert background music tracks or voiceovers into clean MP3 or WAV files before importing them into your timeline.
Common Mistakes to Avoid When Exports Freeze
When your project is stuck, avoid these quick reactions that can actually damage your project data:
- Spamming the Export Button Continuously: If a render fails, trying again immediately without changing anything simply re-runs the exact same error loop, heating up your device and further straining your system’s temporary memory.
- Force-Closing the App Mid-Write: If the progress bar seems slow but is still technically moving, leave it alone. Force-closing CapCut while it is actively writing data to your hard drive can create corrupted media files and, in worst-case scenarios, can corrupt your underlying project save file.
Final Thoughts
A failed export is the ultimate momentum killer, but it doesn’t mean your hard work is lost. By systematically identifying the exact point where the timeline chokes, freeing up a comfortable amount of temporary storage buffer, or downshifting your encoding settings, you can almost always get your project safely out of the app. Keep your source assets clean, keep your cache managed, and you can push your videos live without the rendering headache.