

We’ve all been there. You’ve put in the hours, landed the clients, built the store, or scaled your setup, and the money is finally sitting in your account. You go to click “Withdraw” or look forward to your first automatic payout, and then the dreaded notification hits your inbox: “Identity Verification Failed.” Your heart sinks. Your funds are temporarily locked, your account is restricted, and suddenly you’re stuck in a loop of submitting documents to an automated system that keeps spitting them back out.
I’ve personally dealt with this nightmare across Stripe, Payoneer, and PayPal. Last year, while helping a friend set up a new digital venture, our Stripe identity verification failed three times in a row. We used a perfectly valid government ID, yet the AI scanner kept rejecting it with a generic “unreadable document” error. It took us five days of trial, error, and digging into how these financial platforms actually process data to finally get it approved.
If your verification is stuck or failed, don’t panic. These platforms aren’t personally out to get you; they are heavily bound by strict international banking laws called KYC (Know Your Customer) and AML (Anti-Money Laundering) laws. Their automated scanners are incredibly sensitive, and the slightest mistake can trigger a rejection.
Let’s break down exactly why this happens and how you can get your account fully verified and functional without losing your mind.
Why Financial Platforms Reject Your Verification
Before uploading documents blindly for the fourth time, you need to understand what the system is actually looking for. Platforms like Stripe use advanced AI software (like Stripe Identity or Onfido) to match your document data against the text you typed during registration.
Here are the most common behind-the-scenes reasons your verification keeps failing:
- The Name Discrepancy: If your legal ID says “Muhammad Ali Khan” but your Payoneer or PayPal profile says “Ali Khan,” the automated system will flag it instantly. Names must match exactly, letter for letter.
- The Digital Footprint Trap: If you are accessing your account through international residential proxies, multi-login anti-detect browsers, or changing your MAC address frequently to manage overseas profiles, the security system might flag your session as suspicious. Uploading an ID from a “high-risk” or mismatched IP address often leads to automated rejections.
- Low-Quality Images: This is the number one technical culprit. Reflections, glares from overhead lights, blurry text, or cropped edges will cause the AI scanner to reject the file within seconds.
- Expired or Unsupported Documents: Uploading a local driving license when the platform strictly demands an international passport or a national ID card with English characters.
The Step-by-Step Fix for Stripe, Payoneer, and PayPal
If you received a failure notice, you usually get another chance to upload your details. Before you click that upload button, follow this exact preparation checklist to make sure it passes the automated check.
Step 1: Fix the Profile Data Match (Crucial)
Go into your account settings before you attempt re-verification. Look at your personal information details very carefully.
- Check your date of birth. Is it written in the MM/DD/YYYY format or DD/MM/YYYY? Make sure it aligns with your ID.
- Check your spelling. If your document includes your middle name, add your middle name to your profile details.
- If the fields are locked and you can’t change your profile name to match your ID, do not upload the ID yet. Open a support ticket first and ask them to manually update your profile name to match your official document.
Step 2: Master the Lighting and Photography
The AI scanning software needs to read the micro-text on your ID card. A standard phone camera is more than enough, but your technique needs to be perfect.
- Do not use a flash. Flash creates a bright white blind spot on laminated ID cards, making the text unreadable to an AI.
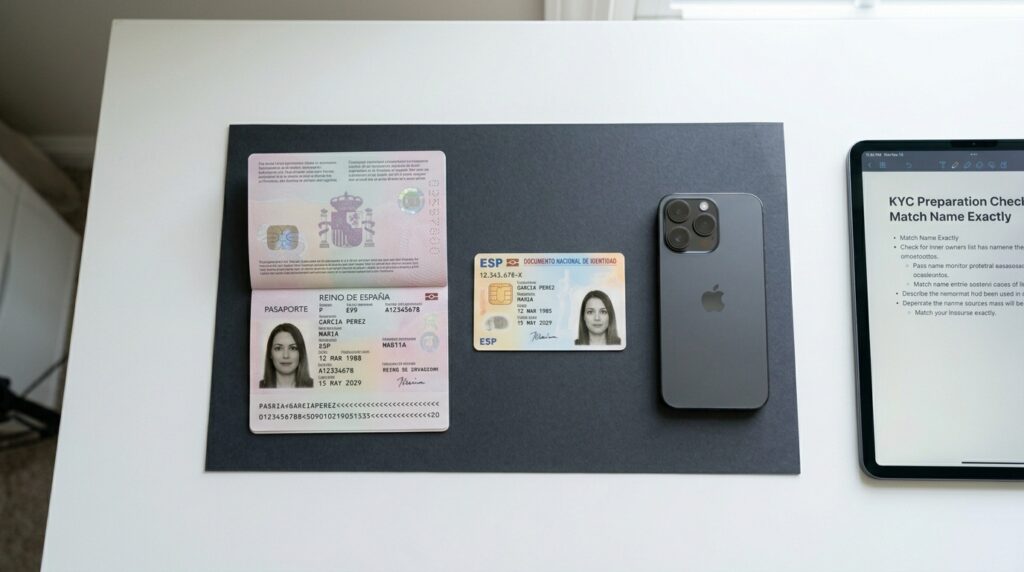
- Use natural daylight. Take your ID over to a window during the day. Place it on a flat, neutral, dark background (like a dark wooden table or a black sheet of paper). This creates a sharp contrast.
- Keep all four corners visible. Do not hold the card in your hand while taking the picture; your fingers will cover important security holograms or text boundaries. Ensure the entire rectangle of the card is clearly inside the camera frame.
- Check for blur. Tap your phone screen to focus directly on the text. Take the photo, zoom in on your phone gallery, and ensure you can clearly read the smallest numbers and letters on the card. If it looks even slightly pixelated, take it again.
Step 3: Clean Up Your Connection Footprint
If you manage international client accounts or work across borders, your digital footprint matters.
- When uploading highly sensitive legal documents, try to use a clean, stable local internet connection if your account matches your actual residential country.
- If you must use a dedicated proxy or a specific browser profile to manage a specific business entity (like a US-based LLC owned by a non-resident), make sure your connection is 100% stable, clean, and hasn’t leaked your actual geolocation before you initiate the verification process. A sudden location drop during a live webcam selfie check will cause an instant permanent ban.
Step 4: The Selfie/Liveness Check
Many platforms now require a live selfie or a 3-second video where you turn your head.
- Sit in a well-lit room with light hitting your face from the front (not from behind you, which turns you into a dark silhouette).
- Take off your glasses, hats, or earphones.
- Look directly into the camera lens, not at your own reflection on the screen.
Real-Life Cases: Platform Specific Quirks
Every platform has its own unique quirks when it comes to security. Having navigated them all, here is what you need to know about each specific giant:
1. Stripe
Stripe relies heavily on automated API verification. If you are a non-US resident running a US business entity, you will often face issues matching your local passport with your US EIN or SSN/ITIN field.
- The Fix: When Stripe asks for identity details, ensure you select your actual home country for the ID document selection, even if your business address is in the US or UK. Don’t try to force a non-US passport into a US document slot.
2. Payoneer
Payoneer is notorious for keeping documents “Under Review” for days, only to decline them without explaining why. They often require a secondary document, like a bank statement or utility bill, to verify your address.
- The Fix: Your address verification document must be fresh (less than 3 months old). If you upload a bank statement, download the official original PDF directly from your banking app. Do not take a photo of your computer screen showing the bank statement; the system rejects digital screenshots instantly.
3. PayPal
PayPal tends to restrict accounts first and ask questions later. If your verification fails on PayPal, they often limit your ability to send or receive funds entirely.
- The Fix: If the automated upload fails on PayPal, your best bet is to switch the language of your approach. Reach out to them via the Message Center during their active working hours and type “Agent” or “Live Human” until you get passed to a real person. Uploading your document directly inside a chat window to a human agent bypasses the buggy AI filters completely.
Common Mistakes to Avoid At All Costs
When you’re stressed about money being locked up, it’s easy to make hasty decisions that end up making the problem permanent. Avoid these critical mistakes:
- Do Not Edit or Photoshop Your Documents: Never try to “fix” a blurry date or clear up a scanned document using editing software. Financial platforms use metadata scanners that can instantly detect if an image file has been processed through Photoshop, Illustrator, or any editing tool. Even if you just cropped it using a heavy editor, it can trigger a fraud alert, leading to a permanent lifetime ban.
- Do Not Use Scanned Copies or PDFs of IDs: Unless explicitly asked, do not upload a PDF scan of your physical ID card. The AI scanners want to see a raw, unedited JPG or PNG photograph of a physical object sitting on a table. A flat PDF scan looks like a stock image or a template to their security algorithms.
- Do Not Try Repeatedly Without Changing Anything: If your document fails twice, stop. Trying a third time with the exact same photo will likely lock you out completely or trigger a manual review flag that could take weeks to resolve. Fix the lighting, the name mismatch, or the connection issue before attempting again.
Moving Forward: If You Are Completely Stuck
If you’ve tried everything, your photos are crystal clear, your names match perfectly, and the automated system still says “Identity Verification Failed,” you have reached the limit of what the software can do. It’s time to bring in human intervention.
Contact support via Twitter/X (which is often faster than email tickets for platforms like Stripe) or through their official help center chat. Use a clear, polite message like this:
“Hi Support Team, I am trying to complete my identity verification, but the automated system keeps rejecting my official legal documents. My profile name matches my ID perfectly, and the image quality is clear. Could you please route my account to a team member for a manual verification review? Thank you.”
Once a real human being opens your file and looks at your clear photo, they can manually click “Approve” in their backend dashboard within a few minutes.
Stay patient, keep your documents completely authentic, ensure your visual quality is pristine, and you’ll get through the verification hurdle smoothly. Safekeeping your digital identity structure is just part of running a successful online business operation!